
Locking text in Google Docs can save your hard work from unwanted edits, ensuring that your document remains just the way you intended. In this article, we’ll show you how to safeguard your text, making your collaborative experience smoother and more secure. Whether it’s crucial project details, important instructions, or your creative masterpiece, learn how to keep your text locked and your document protected.
While Google Docs doesn’t offer a direct “lock” feature, there are effective workarounds to safeguard your content. You can freeze text, lock images, and even use add-ons like DocSecrets to encrypt specific sections. These methods enhance privacy and control within your documents
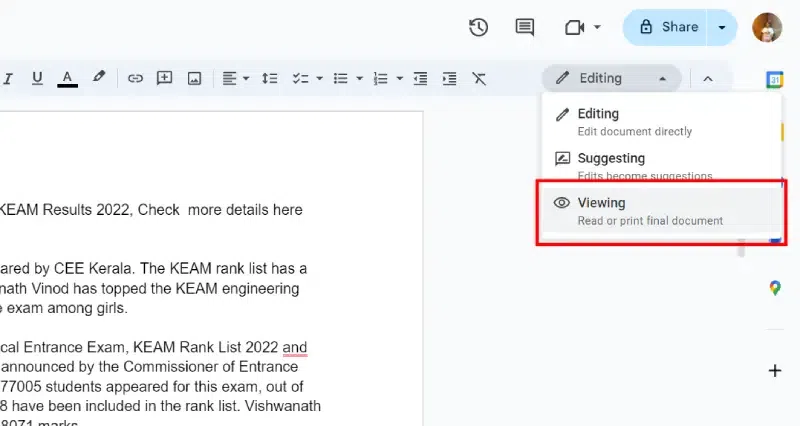
Learn how to freeze text in Google Docs to prevent edits. Remember, these steps help you control who can modify your document,
Launch Google Docs and open the document you want to work with. (To Directly Open Google Docs Click Here)

Remember, this ensures your image stays in place even if you edit the document. To lock images in Google Docs, follow these steps:
Click on the image to reveal the toolbar below it. Next, choose either the Wrap Text or Break Text icon, depending on your preference.
.webp)
Select the Image >>Select In front of text
.webp)
Select Fix Position on Page
Unfortunately, Google Docs doesn’t provide a direct way to lock tables or prevent editing within them.
To maintain table placement – Adjust file permissions from “editing” to “viewing” for specific collaborators. This ensures that others can’t accidentally modify the table layout.
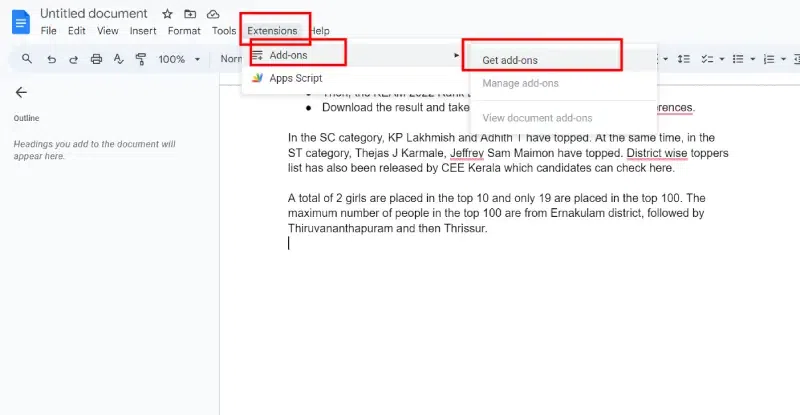
Let’s explore how to encrypt specific sections of a document in Google Docs using the DocSecrets add-on. This method allows you to protect sensitive content with a password. Here’s how you can do the same,
Launch Google Docs and open the document where you want to encrypt text.
(To Directly Open Google Docs Click Here)

In the end, by implementing these tricks, you’ve turned your Google Doc into a perfection of text placement. No more edits or accidental relocations will disrupt your carefully crafted document. Now you can focus on writing with confidence, knowing your content will stay put. So move forward and conquer your next project, with the peace of mind that your text is under your control!
There’s no built-in option to prevent text from being moved around.
Locking specific fields like headers or tables isn’t possible.
Article Tags :You can’t lock parts of the document to prevent editing, but you can restrict editing permissions for the entire document.
Google Docs is a free online document editor provided by Google. Google Docs makes it easier to create a document for personal and professional uses with a variety of features. Some of the features in Google Docs are customizing font styles, font size, text alignment, and inserting media such as images, tables, word art, charts, sheets, and many more. The content in a document can be made presentable using spacing, page numbers, bullets, numbering, subscripts, superscripts, etc. Google Docs comes with more formatting features that help users to change the text content in the document in the way the user wants such as color, font, sizes, capitalization, underlining, and more. This saves time for users to work on the content of the document. Changing Uppercase and Lowercase Text in Google DocsWhen we are working on a document with text content, we may have written the text in all lowercase. But suddenly, we may need to change all those characters in the text to uppercase completely, or vice versa. In such a situation, we do not need to retype the word of that text to uppercase or lowercase. Google Docs comes with a helpful feature for eliminating that risk by quick and easy steps. In

Google Docs is a free online document editor provided by Google. Google Docs makes it easier to create a document for personal and professional uses with a variety of features. People often take photos of notes on the blackboard a billboard, or from a newspaper for using it later. These text contents in photos may be needed to type into a document. Sometimes the image may be having 1 or 2 lines of content in it. Sometimes it can have many lines of text in the image. It takes a lot of time to type all that into a document by seeing the image every time. Fortunately using Google Docs, we can save time on our work. Google Docs comes with an OCR tool. OCR means Optical Character Recognition which helps in getting all the text content in an image and converting it to digitally typed text. Using this, Google Docs helps us to save time typing all the contents in images to a digitally typed text in a document in Google Docs. This tool of Google helps in converting text in bills on financial analysis, images of book pages, and more. In this article, we will be discussing converting an image to text in Google Docs. How To Convert an Image to Text in Google Docs Step 1: Open Google Drive and
Placing text over images in Google Docs can significantly enhance the visual impact and communication effectiveness of your document. This technique is particularly valuable for creating engaging presentations, flyers, or reports where combining textual and visual elements is essential. Although Google Docs is primarily a text-focused platform, it offers capabilities that allow for the layering of text over images through a few simple steps. This article will guide you through the process of putting text over an image in Google Docs, on desktop as well as mobile utilizing built-in tools to achieve a professional and visually appealing layout. How To Put Text Over An Image In Google DocsStep 1: Open Google Docs and Select DocumentOpen Google Docs on your Desktop and select a document in which you want to insert text over an image, you can also go with your existing document or you can create a new one. Step 2: Click on Insert TabAfter opening Google Docs on your Desktop go to the Drawing sections of Google Docs to do so click on the "Insert" tab located in the toolbar. Step 3: Select "Drawing" and NewWhen you click on the Insert tab a drop-down menu will appear containing many optio